Introduction
This tutorial documents the steps I’ve taken to setup my studio machine for music creation using Linux. This is the first part of a multi part series.
Why would you want to make music under Linux when there is already so much available in the Mac and Windows ecosystems for audio production?
- Low cost:
The cost of entry into audio production and recording in Linux is extremely low. The OS and software is completely free. There are hundreds of capable free synth and audio plugins available. There is no need to worry about iLok licenses, number of software unlocks allowed, etc. - Ability to contribute to open source by pursuing your passion for music/audio
Many people love open source software but are confused as to how best contribute back to the community. A good way to approach this is to pick a piece of software you are passionate about and use all the time. If you are a musician/sound designer then that piece of software will be your DAW and audio plugins. Posting bugs or feature requests to the GitHub/Sourceforge/Forum of your favorite audio software is a great way to contribute back. - Advanced Audio/MIDI routing capability with Jack
There isn’t really an equivalent audio system like Jack on Mac or PC. Jack allows audio/MIDI to be routed freely between programs in a modular way. This means that one program, such as Hydrogen, could be used to sequence drums. The audio output of Hydrogen can be sent to QTractor for monitoring while tracking live electric bass to the drums. This is a simple example.
This is not possible in Windows. The closest solution is using Virtual Audio cables. This only allows routing of audio.
For advanced audio routing on a Mac, there is SoundFlower. Again, this only allows routing of audio.
Distribution used in this tutorial:
If you are using any of the audio/media focused Linux distributions below, you can skip to the Configuring Jack section.
What difference does the Kernel make?
There is a great description of the different kernel types available at: https://help.ubuntu.com/community/UbuntuStudio/RealTimeKernel
The most useful information that can be garnered from this entry(copied and pasted from the above wiki page):
- If you do not require low latency for your system then please use the -generic kernel.
- If you need a low latency system (e.g. for recording audio) then please use the -preempt kernel as a first choice. This reduces latency but doesn’t sacrifice power saving features. It is available only for 64 bit systems (also called amd64).
- If the -preempt kernel does not provide enough low latency for your needs (or you have an 32 bit system) then you should try the -lowlatency kernel.
- If the -lowlatency kernel isn’t enough then you should try the -rt kernel.
- If the -rt kernel isn’t enough stable for you then you should try the -realtime kernel
Note that the generic kernel can be configured to give audio applications realtime privileges. For details on this, see the Jack Audio info page here: http://jackaudio.org/faq/linux_rt_config.html
Since we are using an Ubuntu based system, we simply need to add our user to the audio group, which will occur later in this tutorial.
I am currently using the low-latency kernel. In my experience, the -generic kernel is not suitable for any realtime monitoring of audio recording such as tracking guitar, bass or drums. The user cannot achieve a low enough latency and they will experience a high number of dropouts. It will work fine for MIDI/VST sequencing.
Notes about the audio system in Linux
For an in depth explanation of Linux audio, please see: https://www.ghacks.net/2017/08/16/linux-audio-explained/
There are 3 major audio systems in our Linux distribution:
- ALSA :
This is the layer that communicates with the hardware. It can be selected directly in audio applications. PulseAudio and Jack connect to ALSA to output their audio.
ALSA is single client by default, which means that only one audio stream can be played at a time. PulseAudio or Jack are required to be able to play multiple audio streams simultaneously(such as audio output from YouTube and a DAW at the same time). - PulseAudio:
This is used for outputting system sounds. It handles mixing and routing of audio from different programs. Its output is high latency. - Jack:
This is used for outputting audio from pro applications like synths and DAW’s. Audio and MIDI can be routed to and from many different Jack enabled applications. It can be configured to deliver much lower latency than PulseAudio.
Installing the low-latency kernel
After running the below command the low-latency kernel will be set as the default for your system on boot.
sudo apt-get install linux-lowlatency
Adding the necessary repositories
First add the KXStudio repos using the instructions on their site below:
http://kxstudio.linuxaudio.org/Repositories
After adding the repo be sure to run sudo apt update or you won’t be able to find any of the KXStudio software.
This will give us access to a wide range of useful audio software and tools that are not part of most Linux distributions by default.
Add your user to the audio group
Add your user name to the audio group for realtime privileges:
sudo usermod -a -G audio userName
This is necessary since we are using an Ubuntu distribution. Details as to why can be viewed here: http://jackaudio.org/faq/linux_rt_config.html
Installing the software
Now we are going to install the necessary audio software to get us started. These are software packages that will be utilized in Part 2 of this guide.
sudo apt-get install cadence
sudo apt-get install pulseaudio-module-jack
sudo apt-get install qtractor
sudo apt-get install guitarix
sudo apt-get install calf-plugins
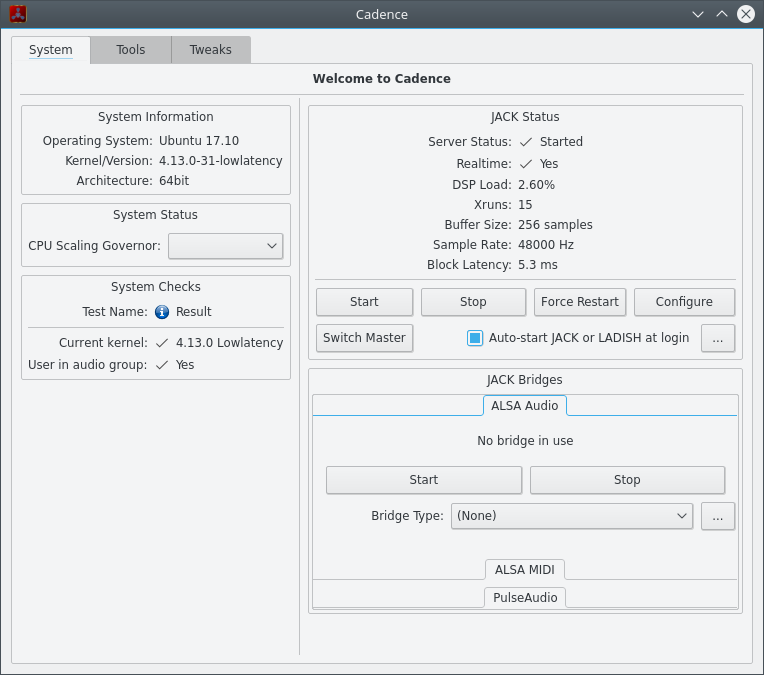
Configuring Jack
We’ve installed Cadence which is a nice front end to the Jack audio server. You can read more about it here: http://kxstudio.linuxaudio.org/Applications:Cadence
- Launch Cadence.
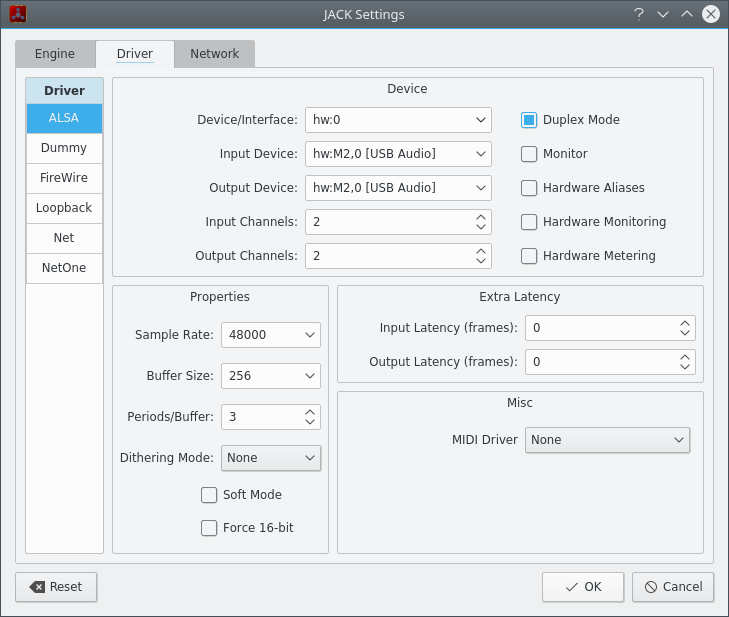
- Click on Configure. Select the Driver tab. Ensure ALSA is the selected option in the left hand column of the window.
- Select your audio card as the Device/Interface. Select it again for Input/Output device.
- Set the appropriate amount of Input/Output channels for your audio interface.
- Under the Properties section set your audio device to the desired sample rate(if in doubt choose 44100) and the buffer size to your desired amount(if in doubt set to 512 for now).
- In the main window, check off Auto-Start JACK or LADISH at login.
- Click Start in the main Cadence window.
- Click on the PulseAudio tab in Cadence and select Start to bridge PulseAudio to JACK. This allows you to hear your web browser and music player while recording. Useful if you want to play a backing track and jam along with it using Guitarix.
Optimizing Jack for your system
Optimizing Jack is a balancing act between trying to achieve lower recording/playback latency while avoiding xruns.
I suggest experimenting by adjusting your buffer size to see how low you can go on your machine while achieving a minimum amount of xruns.
- xruns:
These occur when the buffer size is set to too small a value for the computer to handle. A small buffer means that the CPU has less time to process the incoming audio data. If a system is too slow to process this data, an xrun occurs. This manifests as a popping noise or audio dropout. If you are encountering xruns, it is advised to raise the buffer size that Jack and your audio software is using. - latency:
Latency is the delay from when you perform an action to when it actually occurs. In a DAW, this can be the delay heard when monitoring a vocal take. Your voice plays back delayed through the computer while recording/monitoring. This delay makes performing/overdubbing very difficult.
To reduce latency, a user can reduce their buffer size. If the buffer size is reduced to too small a value, xruns can occur as the CPU does not have enough time to process the incoming audio data.